|
|
|
نوشته شده توسط : Likaibin
Have 2013 Hyundai i40, the key starts the car, put the buttons don’t work, so I’m going to use the OBDSTAR X300 Pro4 to program the key.

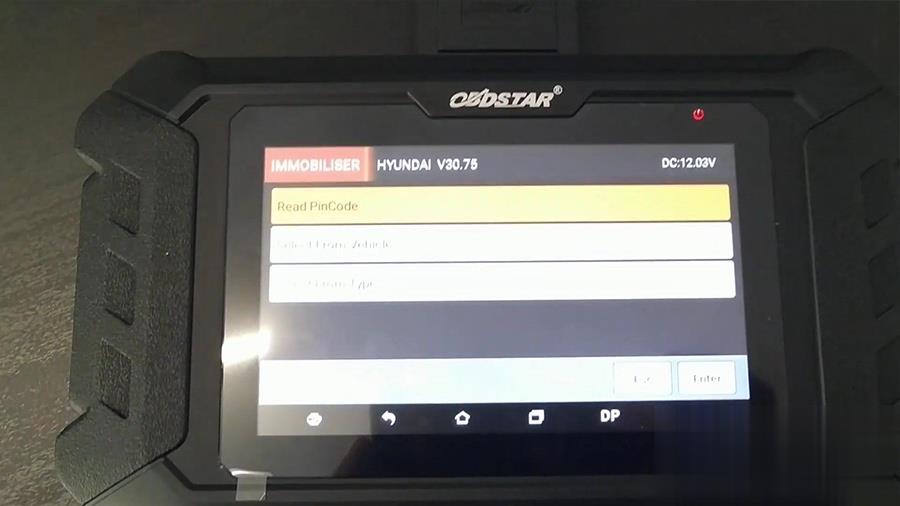
Put into the OBD port.

Select from vehicle.
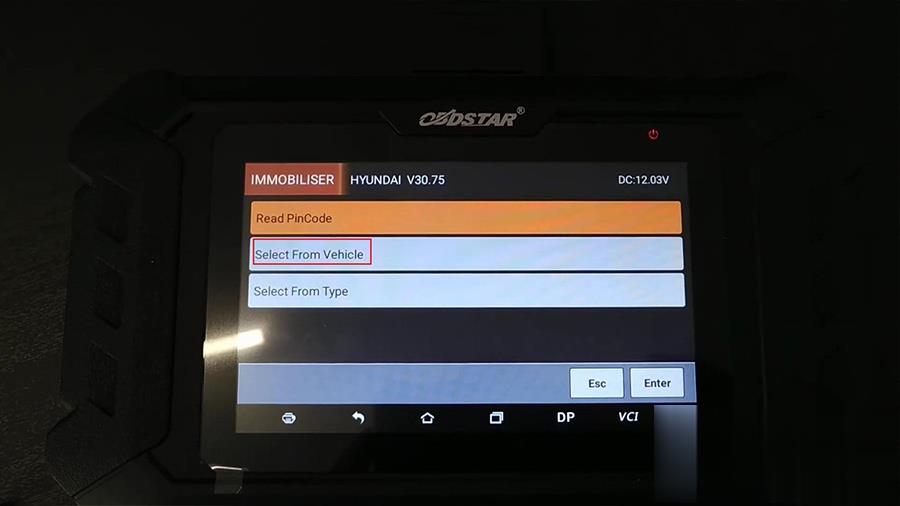
Europe.
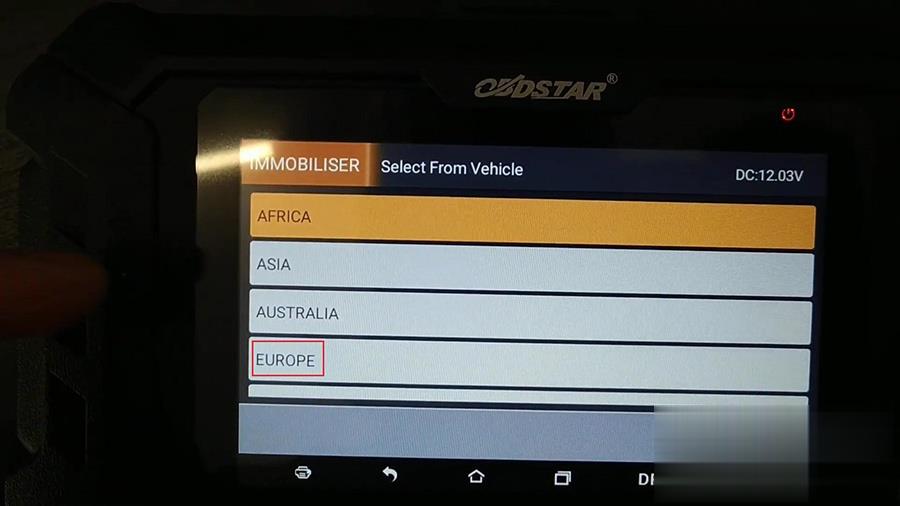
i40 is here.

I can “Select from type”, then “Remote”.
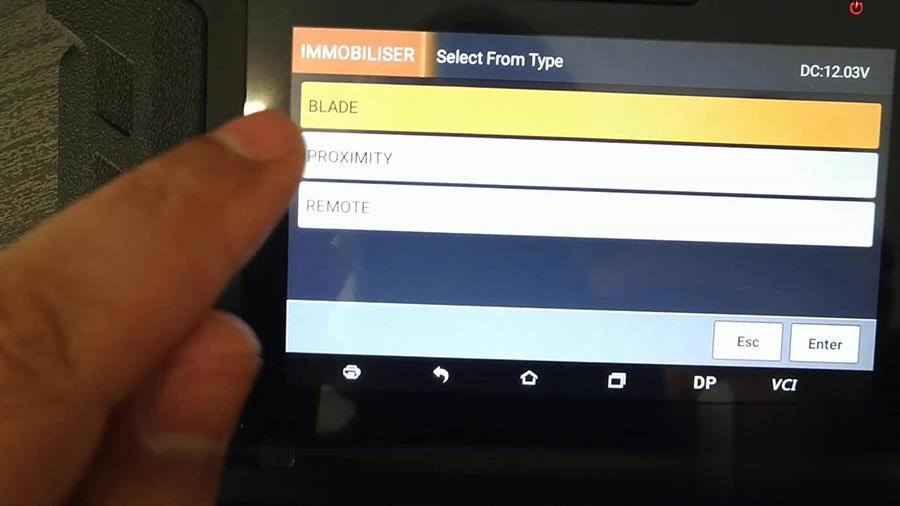
16pin obdii connector.

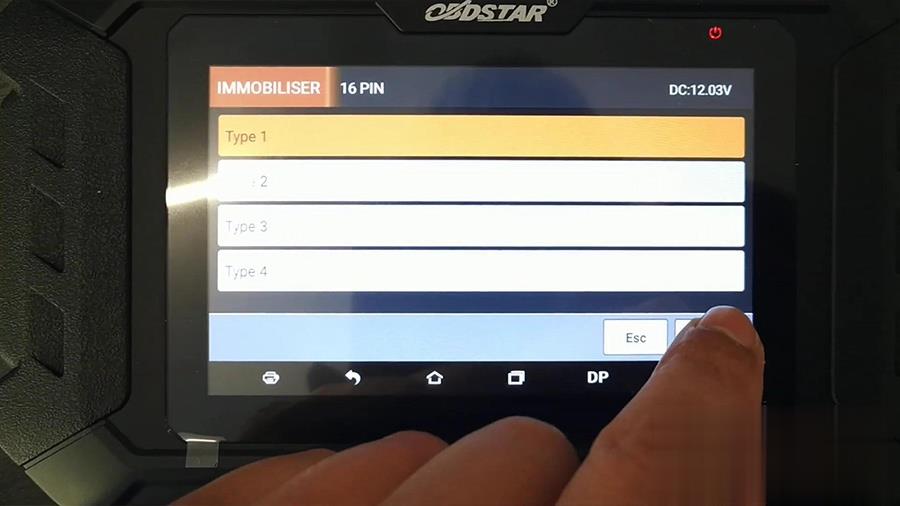
Type 1.
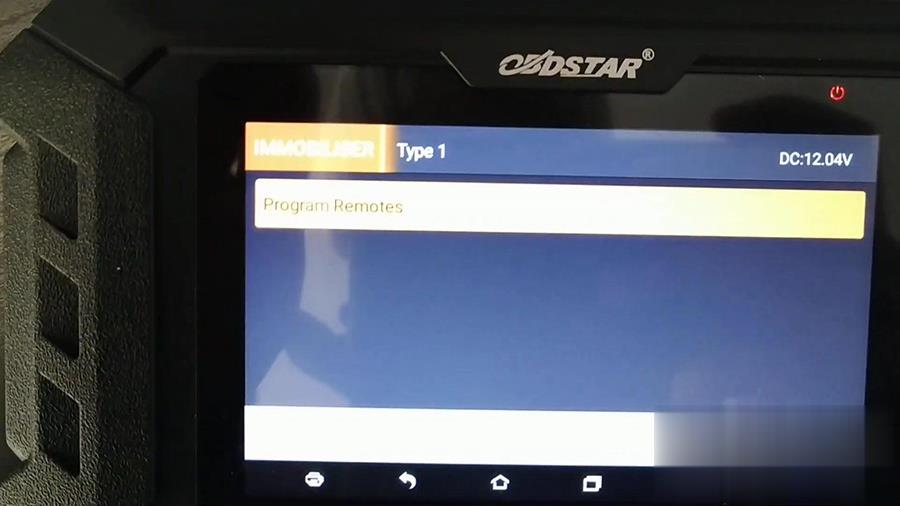
Program remotes.
It says “Switch ignition on and then switch ignition off and remove key, press ENTER to continue.


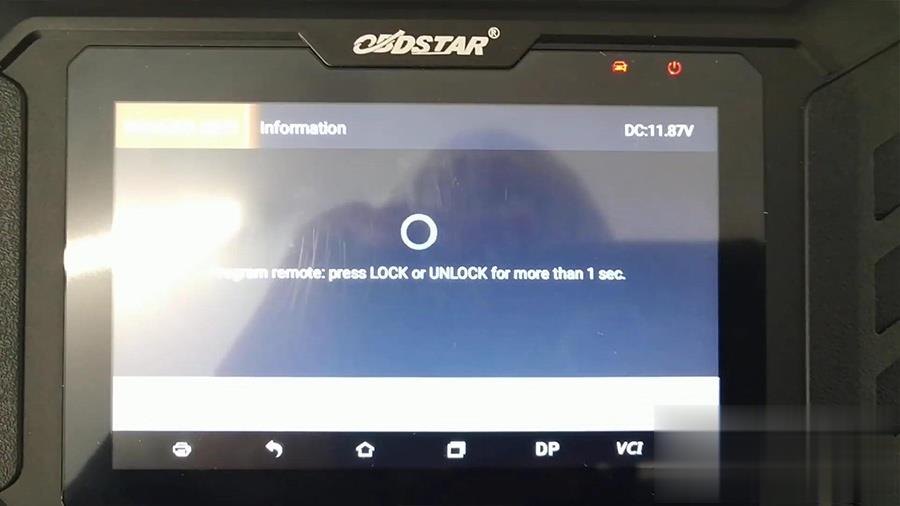
Press LOCK or UNLOCK for more than 1 sec.
Program success, whether to program next one?
Press [Enter] to continue.

Esc and it displays ” Program complete”.

Power off OBDSTAR X300 PRO4.
Unplug the OBD2 cable and to test the remote.
You see it is working
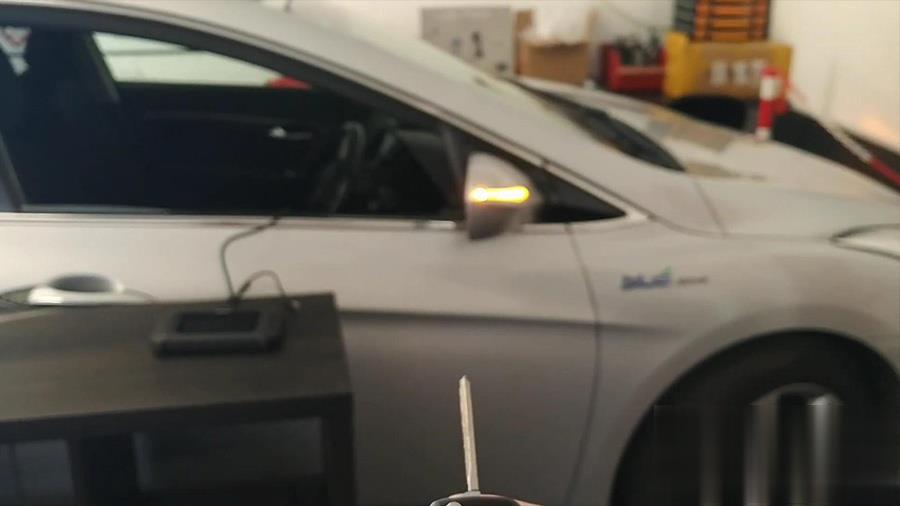
Okay, very good programmer OBDSTAR X300 PRO4.
:: برچسبها:
OBDSTAR X300 Pro 4,OBDSTAR X300 Pro4, ,
:: بازدید از این مطلب : 120
|
امتیاز مطلب : 0
|
تعداد امتیازدهندگان : 0
|
مجموع امتیاز : 0
تاریخ انتشار : یک شنبه 9 شهريور 1399 |
نظرات ()
|
|
نوشته شده توسط : Likaibin
Caterpillar (CAT) Flash File is a Flash memory programming of onboard ECMs with the CAT ET 2020A software
The software is necessary for the companies involved in the diagnosis of construction and special equipment Caterpillar.
Please check the preious version of Caterpillar Flash Files 07/2019 4-DVD Set
The latest release of the full set of CAT Flash Files contains:
Flash Files DVD 01 (DVDA9022-21) Download the text file with the DVD 01 contents.
Flash Files DVD 02 (DVDA9023-21) Download the text file with the DVD 02 contents.
Flash Files DVD 03 (DVDA9024-21) Download the text file with the DVD 03 contents.
Flash Files DVD 04 (DVDA9025-21) Download the text file with the DVD 04 contents.
Flash Files DVD 05 (DVDA9026-21) Download the text file with the DVD 05 contents.
Languages: DE, ES, FR, IT, JP, PT, CHS
You can check if your fls or lf2 file is included.
Screenshots for Caterpillar (CAT) Flash File DVDs 2020:
Our company provides for sale original spare part catalogs, workshop manuals, diagnostic software for all models of engines, cars, trucks, buses, forklifts, tractors, harvesters, cranes, buldozers, generators, construction and agricultural machines, motorcycles. To purchase a catalog online, please add the product to your cart, fill in the contact form online. Our managers proceed your order the same day.
:: برچسبها:
CAT SIS,Caterpillar SIS,SIS CAT,CAT SIS WEB,SIS WEB, ,
:: بازدید از این مطلب : 116
|
امتیاز مطلب : 0
|
تعداد امتیازدهندگان : 0
|
مجموع امتیاز : 0
تاریخ انتشار : سه شنبه 21 مرداد 1399 |
نظرات ()
|
|
نوشته شده توسط : Likaibin
The new Mercedes Benz diagnostic tool MB SD Connect C5 is verified working great. Here are customer feedback to Benz C5.
SD Connect (not original Xentry Connect C5).
1.“Mercedes Sprinter year 2006 and 2014 works, both thediagnosis. All the personal cars also works, no problem”
2.“All the trucks including euro6 also works, no problem. Bus Mercedes Tourismo euro5 year 2010-2012 test works, BUT year 2014 euro6 does NOT work, it says that the license is invalid. Both sd c4 and sd c5, we have tested both on the same cars, to be sure.”
3.“SD Connect C5 this one customer has test, works good, in function it no difference with SD C4, but performance it is better. So you can buy MB SD C5 if you want buy new MUX. SD C5 use the same software as MB SD Connect C4.
4.“I have used V2016.12 software. I am ready to order the new 2017.05V software. It is said that the 2017.05 DAS/Xentry has improved a lot. New software in SSD runs faster and much more steable on Windows 7 or Windows 8 instead of Windows XP system. Also, new WIS and EPC parts catalog offers more full information for more models.
Well, my friend with 2016.12 version saying earlier Daimler AG needs the user name and password to login, but in this version, no need that.”
:: برچسبها:
MB SD Connect C5,MB SD Connect C4 ,
:: بازدید از این مطلب : 158
|
امتیاز مطلب : 0
|
تعداد امتیازدهندگان : 0
|
مجموع امتیاز : 0
تاریخ انتشار : سه شنبه 17 تير 1399 |
نظرات ()
|
|
نوشته شده توسط : Likaibin
When you choose SBC system, it will have an option, SBC RESET, after you enter this option, you will see special function, enter this and it will ask for the password, for this password, just fill anything you like, then click next step, then click ok, then follow the prompt to do next.
Proper steps here:
Connect MB SD C4 mux with W211 and laptop.
Start Star diagnosis software.
Select chassis: SBC – Sensotronic Brake Control
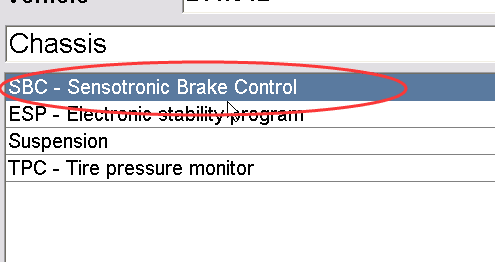
?Select Control unit adaptions, and click on the tick button to continue.
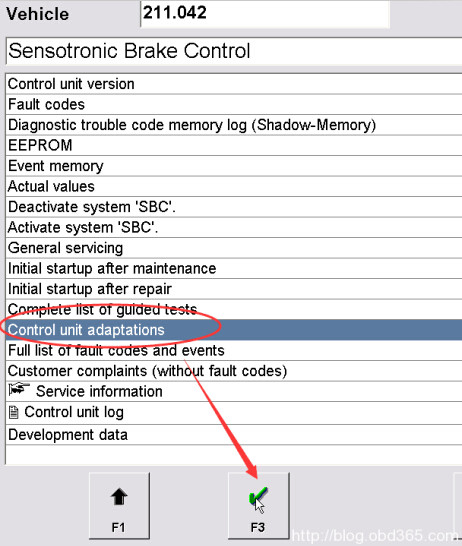
Select Special functions and click on the tick button to continue.
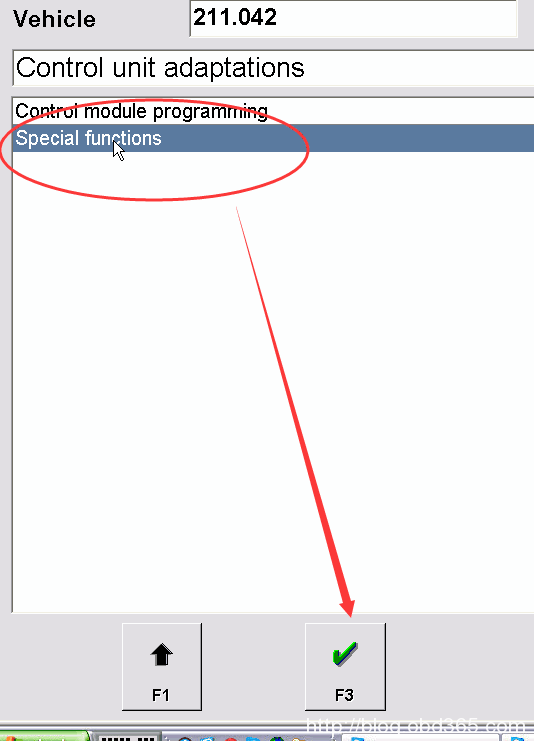
Set a password as you like, then to continue.

Click OK.
Follow the instruction on the screen to reset SBC brake.
Note
If you got German language Star diagnostic software, then follow instruction here
?SBC TOOLS RESET
It started like most of them…….
As a request !!
So it was a combination, of a faulty SBC, common sence, LOTS of time and GUTS to figure this out
Make sure engine is running !!!
In Developer mode you need to go to Entwickelingsdaten –> ansteueringen –> Gesamstliste aller Ansteuerungen
to see how many times brake has been pressed there is a line that says: Bremsenzahler (DJ_GetBrLive) or DJ_GetBrLiveTime
then 1 line down there you see Bremsenzahler aktualisieren und Lebensdauerzahler F neu berechenen –> click it !
Parameter uINBR = 0
then click F3
1 line down Bremsenzahler auf beliebigen Wert setzen (DJ_SetNBr) –> click it
Parameter uINBR = 0
then click F3
then scroll down untill you see the line’s :
Lebensdauerzahler F neu berechenen (DJ_CalcLiveTime)
Parameter uINBR = 0
then click F3
Lebensdauerzahler F neu berechenen und schreiben (DJ_BuildAndWriteF)
Parameter uINBR = 0
then click F3
Log out of SBC !!
log out of verhicle !!
let engine run at least 10 minutes or drive at least 10 minutes
If no coils are damaged, SBC fault code is not AKTUEL nomore
Note:
(Dj_setNBr) Here you SET new brake counter value back to 0
(Dj_setNBr) uINBR = 0
Resetting break counter to zero is in my opinion, not messing with …..
each time SBC powers up it checks itself time after time
If there occures any problem in SBC unit with valve, brushes or whatever, it will go into error anyway. that you will NOT be able to erase in Dev mode
If you switch on contact of Brand new MB with SBC and press break 300.000 times it will go into this so called “error” you wanna say SBC is broken then ? without driving a milimeter ?
No it’s indication to have SBC unit checked by MB workshop $$
Yes it’s true that MB has to replace Faulty SBC units for free
since Factory will pay all there labor & material
But most Dealers try to have costumer pay for this procedure claiming costumers car has no a Dealer serviced History
:: بازدید از این مطلب : 145
|
امتیاز مطلب : 0
|
تعداد امتیازدهندگان : 0
|
مجموع امتیاز : 0
تاریخ انتشار : سه شنبه 17 تير 1399 |
نظرات ()
|
|
نوشته شده توسط : Likaibin
2020 Scania VCI3 SDP3 with full chip is much better than the VCI3 released in 2017 year.
Look at full chip Scania VCI-3 internal PCB:
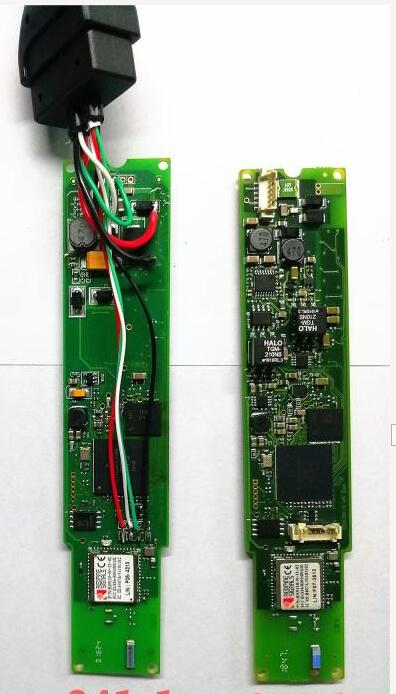
SDP3 software: 2.43.01
Pros of full chip:
Higher hardware quality
Running more stable
Cons of full chip:
At higher price (for $139, and the simplified version is $99)
Look at Scania VCI3 with simplified PCB:
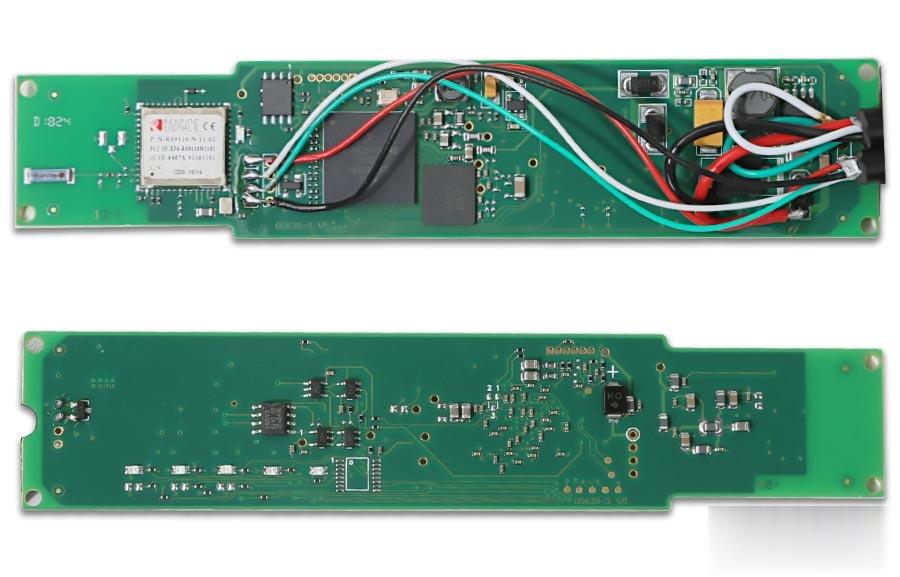
SDP3 software: 2.43.01
The similarities:
1. The same outlook
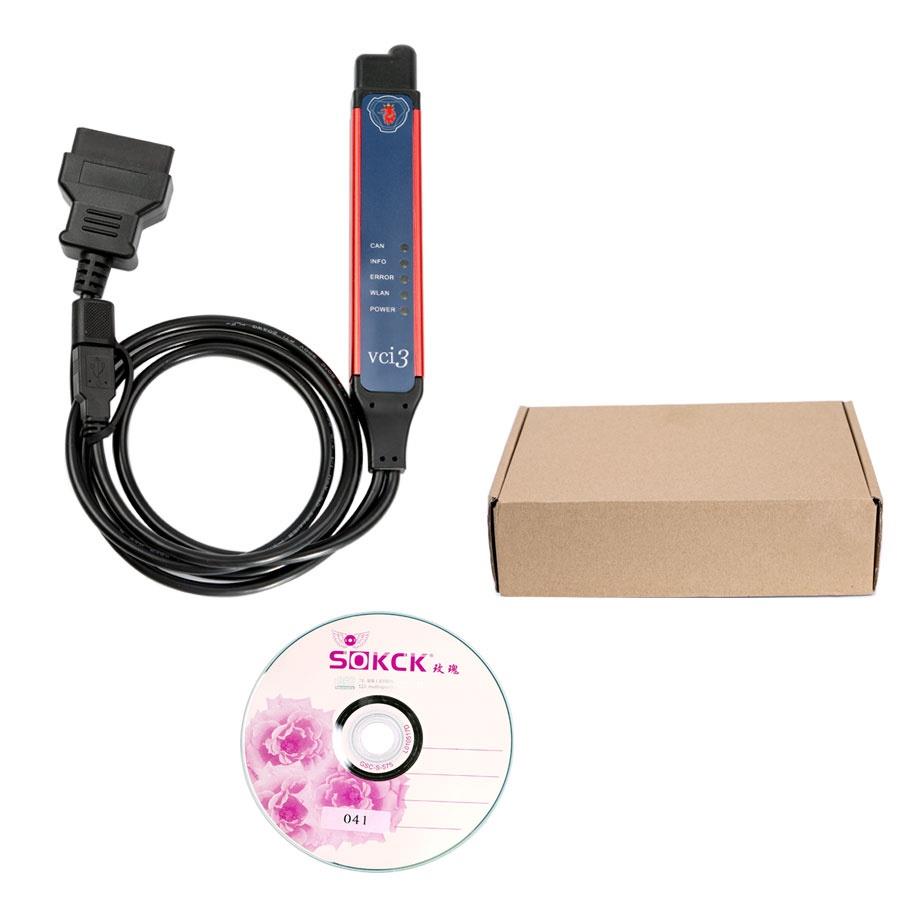
– Lightweight aluminum housing with IP67 protection
– Operating voltage CAN BUS (7 – 40V DC)
– Polyurethane cables for extreme conditions.
– Operating voltage CAN BUS (7 – 40V DC)
– Scania VCI3 is the Scania diagnostic system based on CAN network, working extremely fast.
– Encryption protocols: WPA2/WPA/WEP128/WEP64
2. The same Scania SDP3 2.43.01
Scania VCI3 comes with latest version of SDP3 (2.43) and USB license key (HASP key).
Only work with Scania SDP3 2.43 or newer versions released in future .
OS: Windows 7 32 & 64 bit, Windows 8/8.1 32 bit, Windows 10 32 bit.
Language: English, German, Spanish, French, Japanese, Dutch, Persian, Polish, Portuguese, Swedish, Norwegian, Suomi, Turkish, Italian, Czech, Russian, Chinese.
Scania SDP3 2.43.1 new features:
It can support Scania heavy duty trucks and buses till year 2020.
C, K series buses
This issue contains additional support for the next generation of buses.
Electric vehicles
This issue contains additional support for electric vehicles.
New wizard on deleting recall campaigns
The Delete recall campaign message in the instrument cluster wizard has been added. This can be found in the function view under functions for connected vehicles.
System-specific new features
VIS – Extended troubleshooting support for the AVAS control unit, E531
Extended troubleshooting support is available for the AVAS control unit, E531, which manages the acoustic vehicle alert user function. Its purpose is to inform vulnerable road users of quiet vehicle operation by means of an audible signal.
3. Same communication method:
– WIFI (WLAN version 802.11b/g) – You can work via WIFI with your truck, just forget problems like damaged data cables and other disadvantages of wired connections.
– USB 2.0 (compatible with USB 1.1)
4. The same coverage:
Scania VCI3 is a brand new tool designed by Scania to provide full maintenance for all Scania trucks, buses and other heavy vehicles or heavy duty engines made by Scania.
– Does not work with trucks and engines before 2004.
Enjoy!
:: برچسبها:
Scania VCI3 ,
:: بازدید از این مطلب : 126
|
امتیاز مطلب : 0
|
تعداد امتیازدهندگان : 0
|
مجموع امتیاز : 0
تاریخ انتشار : چهار شنبه 28 خرداد 1399 |
نظرات ()
|
|
نوشته شده توسط : Likaibin
ow to bypass the security gateway module on 2018+ Chrysler so that you can clear codes, active test, bi-directional control special functions, all the things you couldn’t do without either pulling a radio and using a 12+8 cable or just using some other kind of hack or work around. And since this is through Chrysler’s auto off program, this is not a workaround or a hack, this is a legitimate way around it. And Chrysler has authorized Autel tools + Chrysler 12+8 cable to do this.
The next paragraphs will include how to use Autel Chrysler 12+8 diagnostic cable on 2018 Dodge Durango / 2018 Dodge Challenger, and Chrysler 12+8 diagnostic cable compatible Autel tools, coverage, using tips etc.
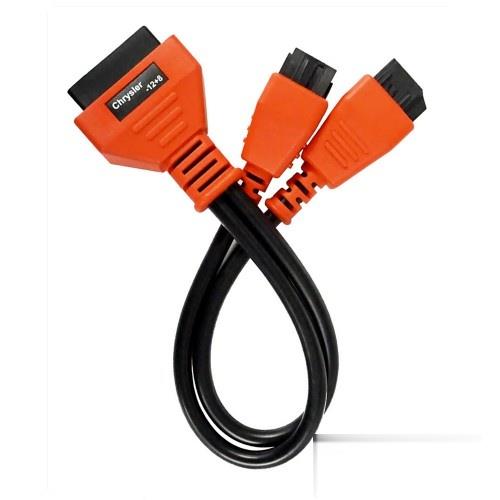
Chrysler 12+8 diagnostic cable can work with: AUTEL MS906BT, MS906S, MS908, MS908S, MS908S PRO, Maxisys Elite
How to install Autel 12+8 adapter?
This adapter will be required when accessing a Fiat Chrysler Dodge and Jeep vehicle that uses a Secure Gateway Module.
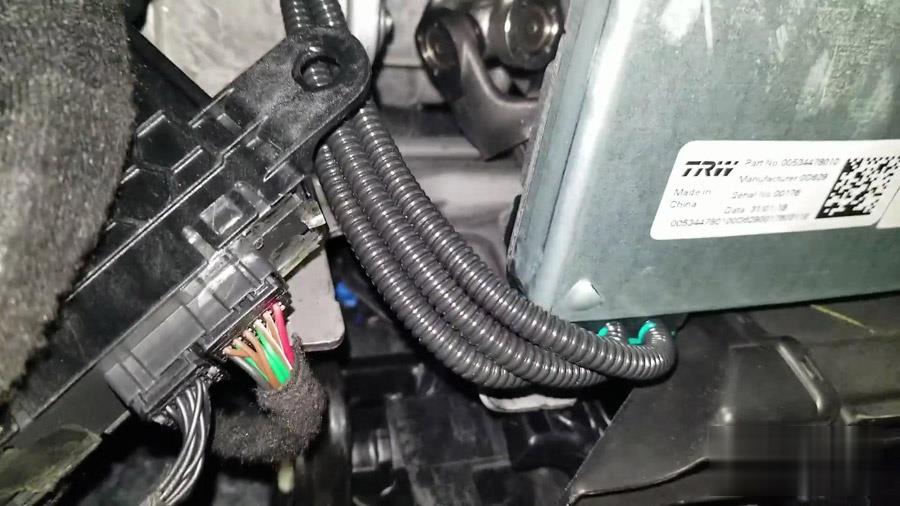
Locate the security gateway module which is installed below the dashboard.
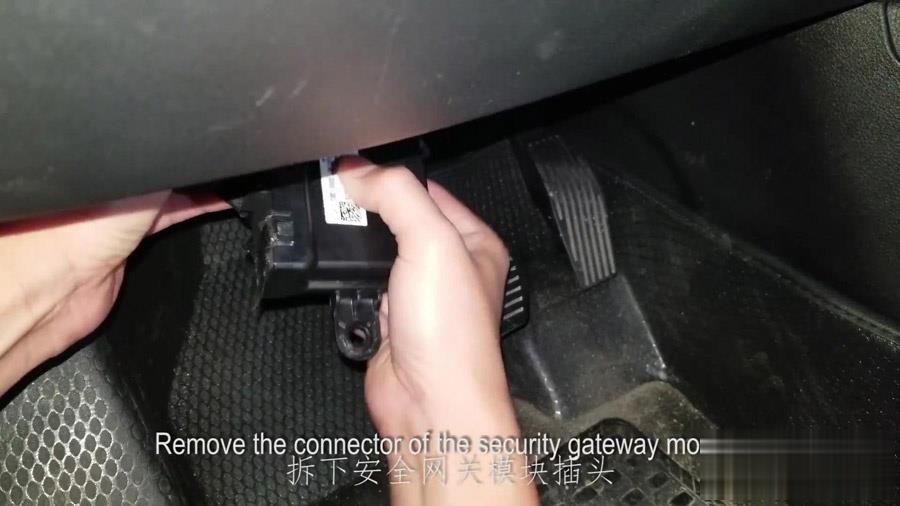
Remove the connector of the security gateway module.
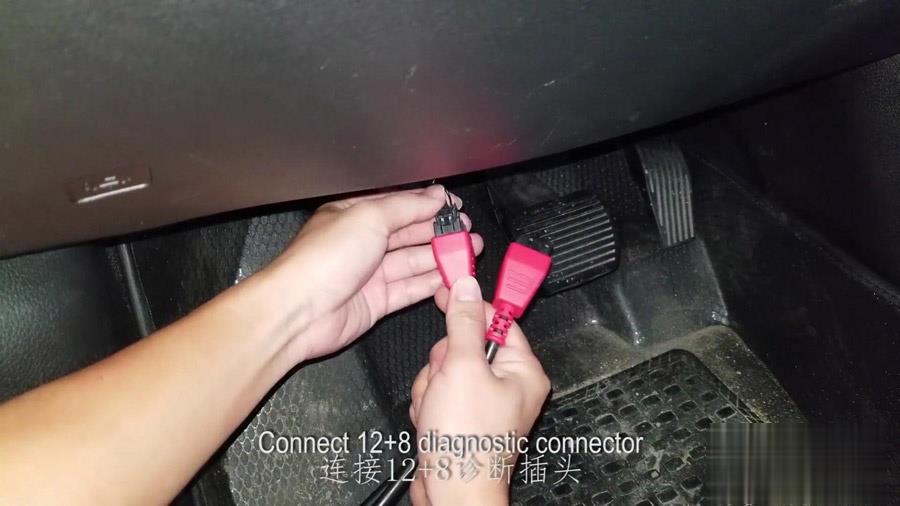
Connect Autel Chrysler 12+8 connector
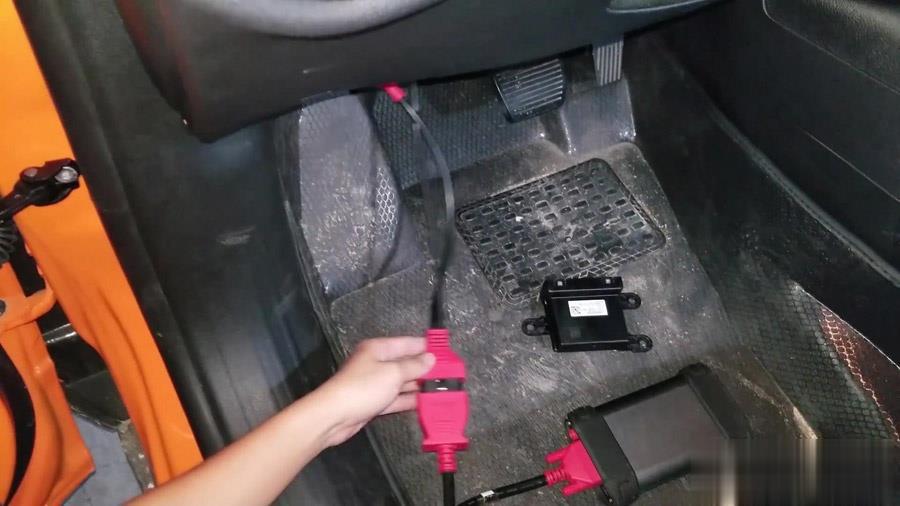
****Autel Chrysler 12+8 diagnostic cable using tips:
Expect to see this message when scanning a Chrysler with the Security Gateway Module:
DEVICE UNABLE TO COMMUNICATE WITH THE CONTROL UNIT
Placement of the SGM varies, but it is often located in the side kick panel, passenger side near the glove box, or behind the radio.
Use Autel Chrysler 12+8diagnostic cable on 2018 Dodge Challenger
It’s behind the radio, so we have to pull this, this is a 2018 Dodge Challenger way to pull this trim piece off. Let the radio hang and then if you come up here, the 12+8 diagnostic cable goes into this black box down here, if you have to reach in and push to release and slide them out and then hook up your 12+8 diagnostic cable.
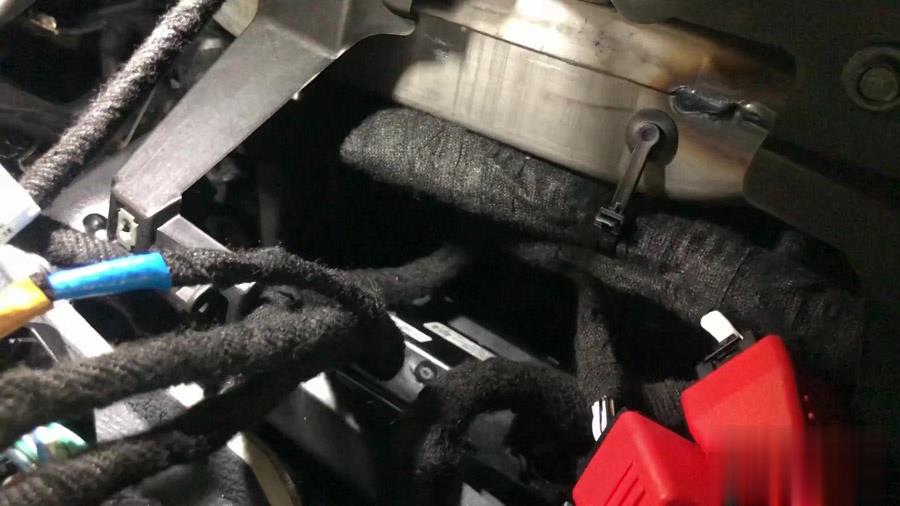
*** Show you how to locate and hook up the Autel 12+8 cable diagnostic cable in a 2018 Dodge Challenger.
So it took us a while to find it, it wasn’t even obvious once we got the radio out. I guess they put him in the kick panel I started there no luck. I was able to scan the codes through the OBD2 connection but I’m unable to clear them this cable right here. This box is what lets you hook up to clear the codes.
Use Autel Chrysler 12+8 diagnostic cable on 2018 Dodge Durangowith AUTEL MS906TS
2018 Dodge Durango and Autel MS906TS, this is one of Chryslers that requires Autel Chrysler 12+8 cable which is not early as easy as the OBD2, so on this model in the Autel it drew a circle here I remove this trim panel just one clip nice and easy. These are your clips really tight to pull out, the release is on the back side so towards the driver’s of the car, they pull the release and then I put a pick to work them loose, then they come out, there are no labels or anything that show you that’s the 12+8 diagnostic cable, but that is definitely it and that’s what we had to do to get the pre and post scan done. So just wanted to share. It took me a little while to look around and see it. So I figured I could help you out a little bit.
Alright, thanks.
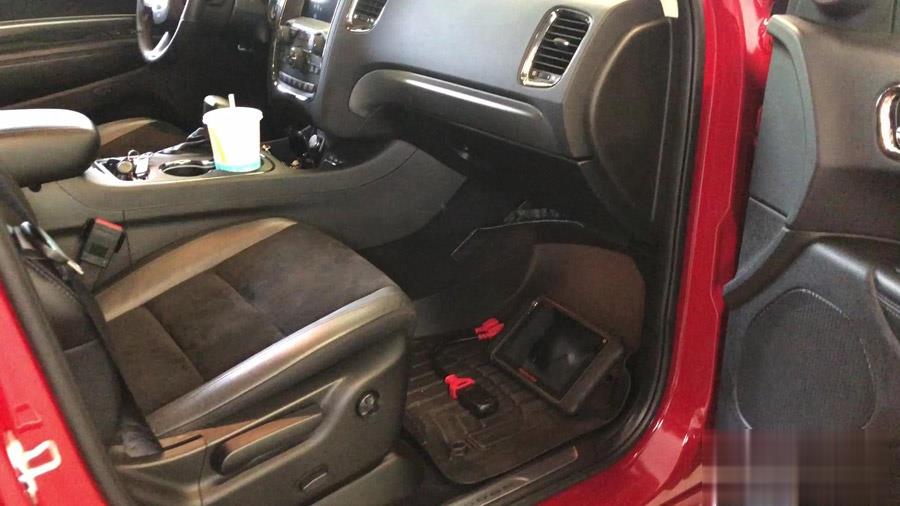

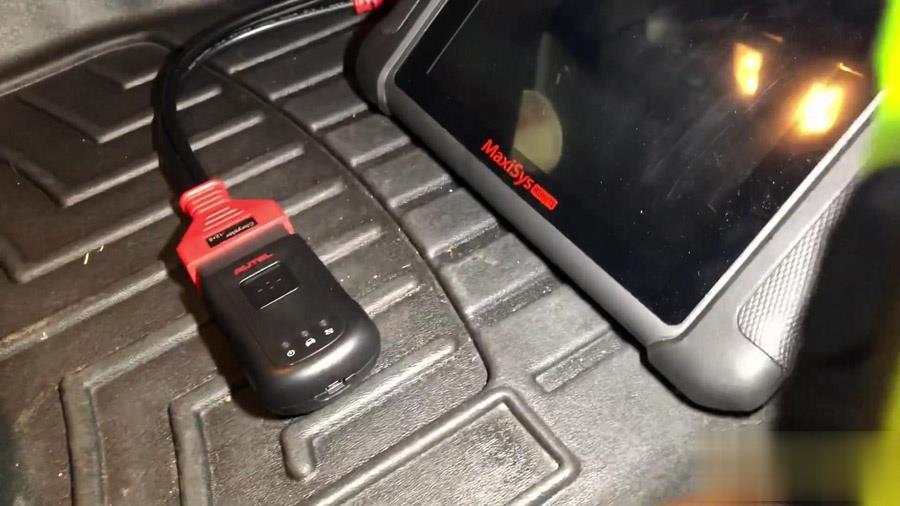
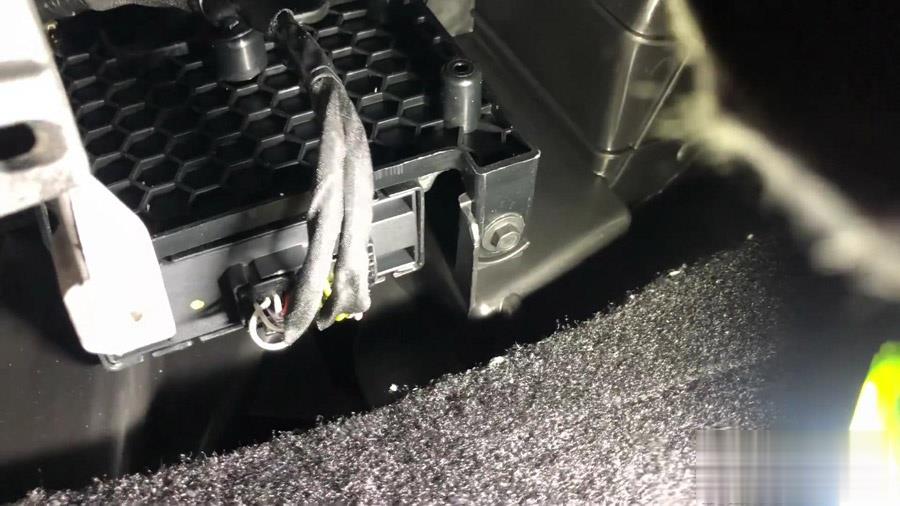
***Show you where to access the 12+8 plug required to do diagnostic scans on a 2018 Dodge Durango. Autel MS906TS with the Chrysler 12+8 adapter.
Autel Chrysler 12+8 diagnostic cable functions:
Read/ Clear Codes
Perform Active Tests
View Generic & Manufacturer Live Data
Perform TPMS OBDII Relearn
Coding and Adaptation with Maxisys Tablet Tools MS906BT+
ADAS calibrations (Requires Maxisys ADAS Software)
Autel Chrysler 12+8 diagnostic cable is used to communicate with the vehicles with Secure Gateway Module:
2018 and newer Chrysler, Dodge, Ram, Jeep, and Fiat now have a secure gateway module or SGM. This SGM will not allow your scan tool to do bidirectional controls on the vehicle. Autel Chrysler 12+8 Adapter can bypass the SGM.
2013+ RAM Promaster
2015+ Fiat 500x
2015+ RAM Promaster City
2016+ Jeep Renegade
2017+ Alfa Romeo Giulia
2017+ Jeep Compass
2017+ Jeep Cherokee
2018+ Jeep Wrangler
2018+ Ram Trucks
2018+ Dodge Durango
2018+ Jeep Wrangler (JL Body only, not JK)
2018+ Dodge Journey
2018+ Jeep Grand Cherokee
2018+ Chrysler Pacifica
2018+ Chrysler 300
2018+ Dodge Charger
2018+ Dodge Challenger
2019+ Most Fiat/ Chrysler/ Jeep/ Ram vehicles
2020+ ALL FCA vehicles
:: برچسبها:
Autel 12+8 cable ,
:: بازدید از این مطلب : 130
|
امتیاز مطلب : 0
|
تعداد امتیازدهندگان : 0
|
مجموع امتیاز : 0
تاریخ انتشار : چهار شنبه 28 خرداد 1399 |
نظرات ()
|
|
نوشته شده توسط : Likaibin
Absolute Pressure is measured relative to a full vacuum (in the empty, air-free space), and uses absolute zero as its reference pressure. Pressure that is measured against Atmospheric Pressure (also known as Barometric Pressure) is called Gauge Pressure.
Average Barometric Pressure (1 ATM) at sea level is ~14.7 Psi (100 Kpa) or 1 Bar.
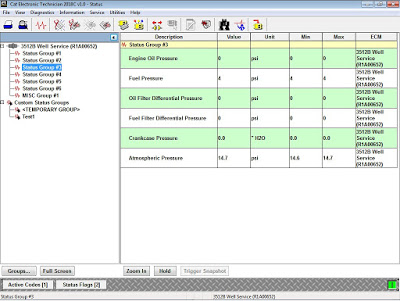
According to two picture,we can find the Formula for the Absolute Pressure:
Absolute Pressure = Atmospheric Pressure + Gauge Pressure
Related Information:
Atmospheric (Barometric) Pressure Sensor
The correct reading for the Atmospheric Pressure Sensor is between 50 kPa (7.3 psi) and 100 kPa (15 psi).
Altitude Derate
The engine may be derated due to high elevation. Use Cat ET to check for an active Engine Derate on the Status Flags screen.
Note: There are no event codes that are associated with the Altitude Derate.
:: برچسبها:
cat et ,
:: بازدید از این مطلب : 125
|
امتیاز مطلب : 0
|
تعداد امتیازدهندگان : 0
|
مجموع امتیاز : 0
تاریخ انتشار : سه شنبه 13 خرداد 1399 |
نظرات ()
|
|
نوشته شده توسط : Likaibin
Absolute Pressure is measured relative to a full vacuum (in the empty, air-free space), and uses absolute zero as its reference pressure. Pressure that is measured against Atmospheric Pressure (also known as Barometric Pressure) is called Gauge Pressure.
Average Barometric Pressure (1 ATM) at sea level is ~14.7 Psi (100 Kpa) or 1 Bar.

According to two picture,we can find the Formula for the Absolute Pressure:
Absolute Pressure = Atmospheric Pressure + Gauge Pressure
Related Information:
Atmospheric (Barometric) Pressure Sensor
The correct reading for the Atmospheric Pressure Sensor is between 50 kPa (7.3 psi) and 100 kPa (15 psi).
Altitude Derate
The engine may be derated due to high elevation. Use Cat ET to check for an active Engine Derate on the Status Flags screen.
Note: There are no event codes that are associated with the Altitude Derate.
:: برچسبها:
cat et ,
:: بازدید از این مطلب : 116
|
امتیاز مطلب : 0
|
تعداد امتیازدهندگان : 0
|
مجموع امتیاز : 0
تاریخ انتشار : سه شنبه 13 خرداد 1399 |
نظرات ()
|
|
نوشته شده توسط : Likaibin
This instruction show you guide on how to use Launch X431 to perform static DPF regeneration for Mercedes Benz Sprinter 906 2007.And for more DPF projects,please check here:DPF repair projects.

For 906 car model equipped with OM646, OM642 and OM651 with diesel particulate filter, when the vehicle is in limp home mode, the engine control module will turn off all the functions to protect the engine. The fault generated by the parts used during the regeneration control will cause failure to perform the DPF regeneration (such as hot-film air flow sensor, temperature sensor). Other trouble code will cause the boost control or exhaust gas recirculation OFF, which will increase the particulates in the exhaust gas. Because those functions are off, the volume in the particulate filter cannot be calculated correctly, leading to an extremely high level of the particulates. This requires performing DPF regeneration once to ensure the diesel particulate filter can be used again.
Particles trapped in the filter will cause the diesel engine’s exhaust back pressure increase. When the exhaust back pressure reaches 16kPa~20kPa, the performance of the diesel engine starts to deteriorate, the DPF(Diesel Particulate Filter) jams, leading to white smoke and weak acceleration, etc.
So it is important to remove the particles regularly, making the filter recover to its original working state, that is to perform the DPF regeneration.
Attentions:
To perform DPF regeneration, it is required to maintain a high exhaust gas temperature. It is quite difficult to rise the temperature only by running the engine at idle. Please drive the vehicle before performing this function. Stop only when the exhaust gas temperature is much higher than the required,and keep the engine run at idle to prevent the exhaust gas temperature from decreasing rapidly.
During the DPF regeneration, a large amount of smoke may be produced. Do not perform this function in a busy traffic environment to avoid traffic accident!
Extremely hot exhaust gas comes out during the DPF regeneration. Watch out for burning!
What You Need?
Launch X431 pro mini on Obd2tool
Operation guide
1.Select the Sprinter Version V20.63 or above.
2.Select manual selection.
3.Select Sprinter.
4.Select 906/900.
5.Select diesel engine and the corresponding model.
6.Select engine system.
7.Select special function.
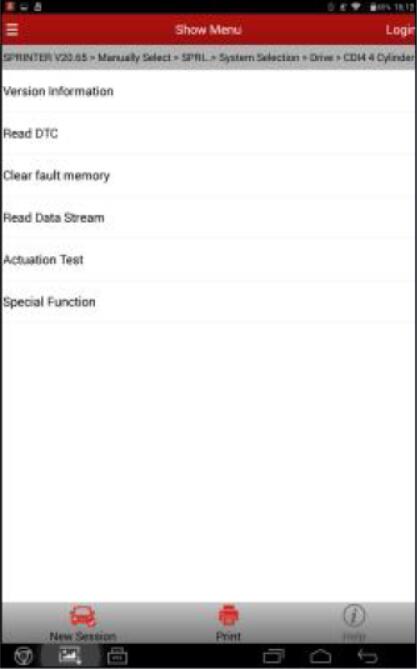
8.Select Diesel Particulate Filter.
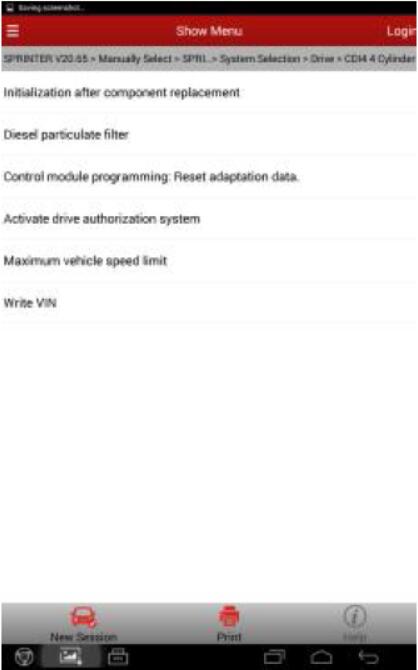
9.Select DPF regeneration during driving.
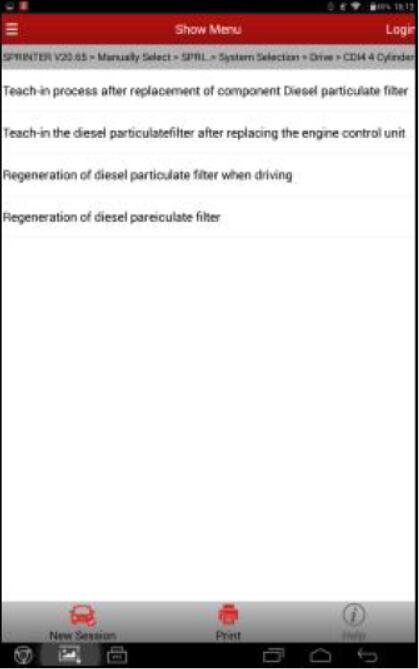
10.After entering the function, prompt appears. Do close the hood and ensure nobody/nothing around the exhaust pipe.
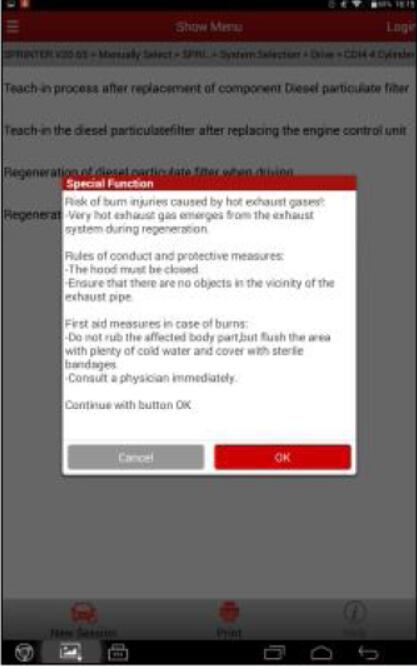
11.Click OK to enter the interface of function preconditions.
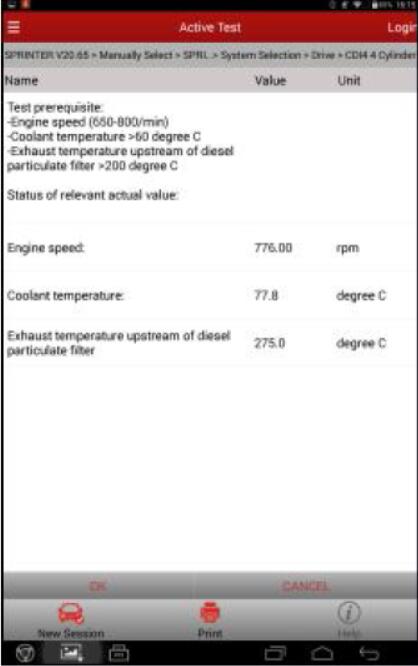
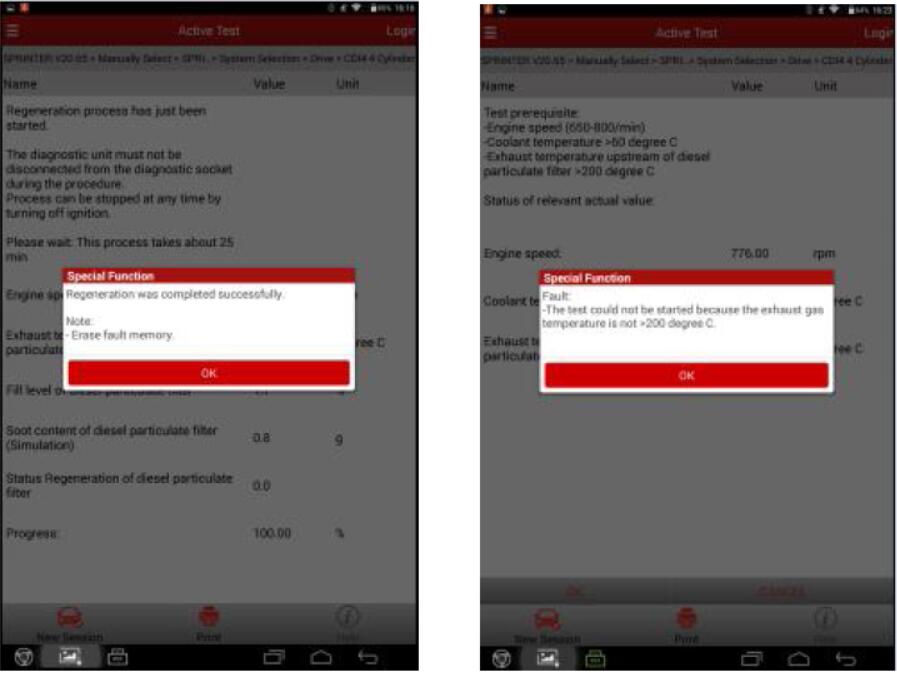
12.Among those preconditions, it is quite difficult for the temperature rising to 200℃(depending on the engine model, some required to 180℃) only by running the engine at idle. If clicked OK without satisfying the temperature requirement, it prompts the following interface.
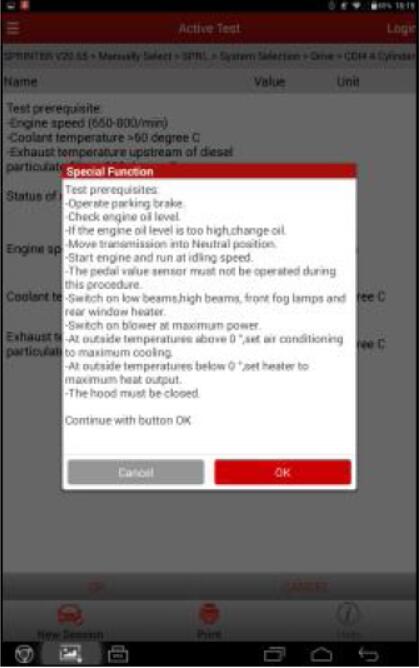
13.Thus, before performing this function or stop at this precondition interface and drive until the exhaust gas temperature is much higher than the required, and keep the engine run at idle to prevent the exhaust gas temperature from decreasing rapidly. Click OK only after satisfying all conditions.
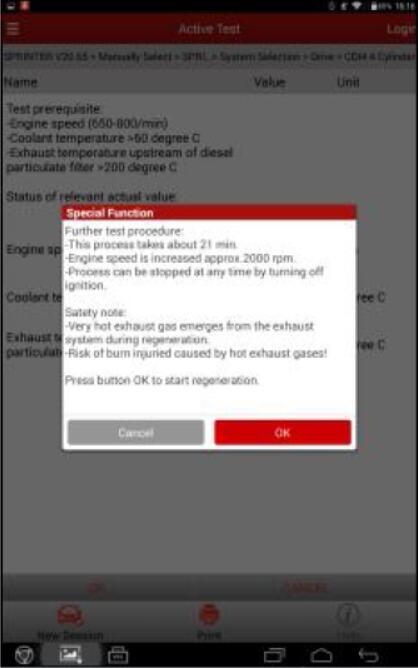
14.Stop the vehicle as prompted and keep the engine run at idle, then click OK to enter the DPF Regeneration.
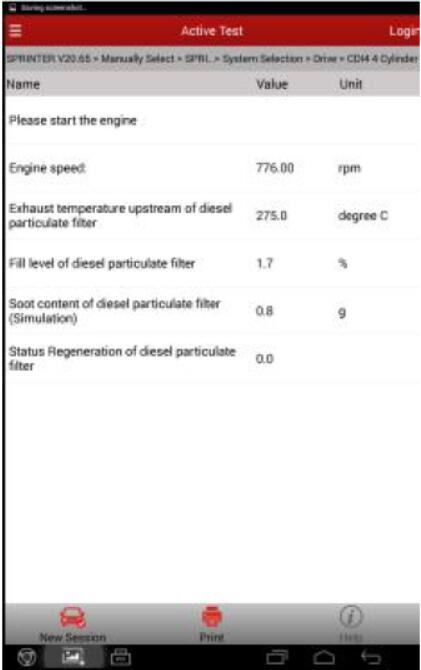
15.During DPF regeneration, the temperature before DPF will automatically increase to a high temperature. For some engine models, it may display the current additive level or carbon content in the DPF, while some others will not display in the interface (depending on the model, not the problem of the software). Both are normal.
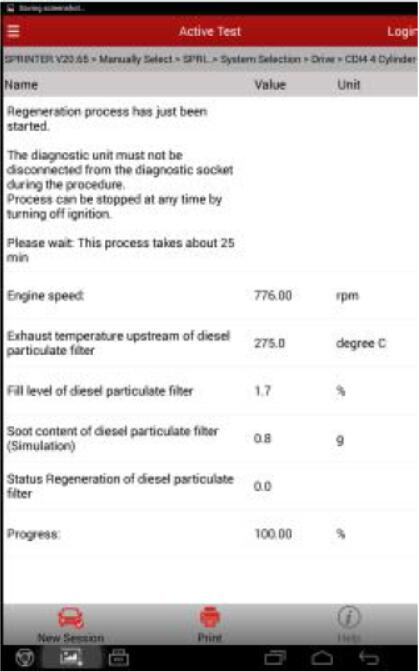
16.During the regeneration, when there are a large number of particles in the DPF, you can easily observe a large amount of smoke coming out of the vehicle exhaust system. Regeneration goes on until the remaining time is ZERO. Now the particles in the DPF are burned. After it ends, enter the following interface.
17.Click OK after confirmation, it prompts the function succeeded.
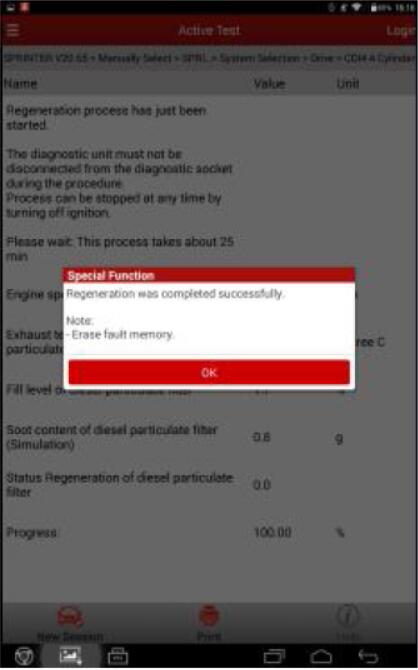
18.If the carbon content displayed in the data stream is still high, check whether there are related sensor DTCs.By now, the particles in the DPF are burned out. The problem of blocking in the DPF is solved. The static DPF regeneration is successfully performed.
:: برچسبها:
LAUNCH X431 ,
:: بازدید از این مطلب : 129
|
امتیاز مطلب : 0
|
تعداد امتیازدهندگان : 0
|
مجموع امتیاز : 0
تاریخ انتشار : سه شنبه 13 خرداد 1399 |
نظرات ()
|
|
نوشته شده توسط : Likaibin
This instruction show you guide on how to use Launch X431 to perform static DPF regeneration for Mercedes Benz Sprinter 906 2007.And for more DPF projects,please check here:DPF repair projects.

For 906 car model equipped with OM646, OM642 and OM651 with diesel particulate filter, when the vehicle is in limp home mode, the engine control module will turn off all the functions to protect the engine. The fault generated by the parts used during the regeneration control will cause failure to perform the DPF regeneration (such as hot-film air flow sensor, temperature sensor). Other trouble code will cause the boost control or exhaust gas recirculation OFF, which will increase the particulates in the exhaust gas. Because those functions are off, the volume in the particulate filter cannot be calculated correctly, leading to an extremely high level of the particulates. This requires performing DPF regeneration once to ensure the diesel particulate filter can be used again.
Particles trapped in the filter will cause the diesel engine’s exhaust back pressure increase. When the exhaust back pressure reaches 16kPa~20kPa, the performance of the diesel engine starts to deteriorate, the DPF(Diesel Particulate Filter) jams, leading to white smoke and weak acceleration, etc.
So it is important to remove the particles regularly, making the filter recover to its original working state, that is to perform the DPF regeneration.
Attentions:
To perform DPF regeneration, it is required to maintain a high exhaust gas temperature. It is quite difficult to rise the temperature only by running the engine at idle. Please drive the vehicle before performing this function. Stop only when the exhaust gas temperature is much higher than the required,and keep the engine run at idle to prevent the exhaust gas temperature from decreasing rapidly.
During the DPF regeneration, a large amount of smoke may be produced. Do not perform this function in a busy traffic environment to avoid traffic accident!
Extremely hot exhaust gas comes out during the DPF regeneration. Watch out for burning!
What You Need?
Launch X431 pro mini on Obd2tool
Operation guide
1.Select the Sprinter Version V20.63 or above.
2.Select manual selection.
3.Select Sprinter.
4.Select 906/900.
5.Select diesel engine and the corresponding model.
6.Select engine system.
7.Select special function.

8.Select Diesel Particulate Filter.

9.Select DPF regeneration during driving.

10.After entering the function, prompt appears. Do close the hood and ensure nobody/nothing around the exhaust pipe.

11.Click OK to enter the interface of function preconditions.

12.Among those preconditions, it is quite difficult for the temperature rising to 200℃(depending on the engine model, some required to 180℃) only by running the engine at idle. If clicked OK without satisfying the temperature requirement, it prompts the following interface.

13.Thus, before performing this function or stop at this precondition interface and drive until the exhaust gas temperature is much higher than the required, and keep the engine run at idle to prevent the exhaust gas temperature from decreasing rapidly. Click OK only after satisfying all conditions.

14.Stop the vehicle as prompted and keep the engine run at idle, then click OK to enter the DPF Regeneration.

15.During DPF regeneration, the temperature before DPF will automatically increase to a high temperature. For some engine models, it may display the current additive level or carbon content in the DPF, while some others will not display in the interface (depending on the model, not the problem of the software). Both are normal.

16.During the regeneration, when there are a large number of particles in the DPF, you can easily observe a large amount of smoke coming out of the vehicle exhaust system. Regeneration goes on until the remaining time is ZERO. Now the particles in the DPF are burned. After it ends, enter the following interface.
17.Click OK after confirmation, it prompts the function succeeded.

18.If the carbon content displayed in the data stream is still high, check whether there are related sensor DTCs.By now, the particles in the DPF are burned out. The problem of blocking in the DPF is solved. The static DPF regeneration is successfully performed.

:: بازدید از این مطلب : 133
|
امتیاز مطلب : 0
|
تعداد امتیازدهندگان : 0
|
مجموع امتیاز : 0
تاریخ انتشار : سه شنبه 13 خرداد 1399 |
نظرات ()
|
|
|
|
|

